
My daughter’s and I have built a number of air boat projects, but this time I thought that I’d try it using MicroPython. MicroPython is a lean and efficient implementation of the Python 3 programming language that includes a small subset of the Python standard library and is optimised to run on microcontrollers.
For this project my goal was to create a MicroPython application that was a standalone WiFi access point, and its used a small web server for controlling the air boat fans.
Hardware
The hardware that I used on this project included:
• 1 – ESP8266 module ($5-$10)
• 2 – L9110 Fans ($5 each)
• 1 – Uno proto shield (optional) or use a small breadboard
• 9V battery or portable phone charger
• K-Nex blocks
• small plastic box
• 2 – plastic water bottles
• duct tape
MicroPython is supported on a number of Wifi enabled ESP32 and ESP8266 modules. These modules are well priced with the NodeMCU modules starting around $5. It’s important to note that most of the ESP-8266 modules also support Lua and Arduino C/C++ programming.
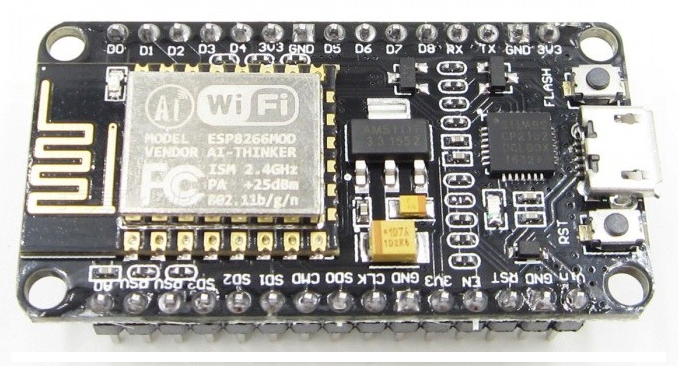
For this project I used an Wemos ESP-8266 module, that comes in a Arduino Uno form factor. I like the Wemos modules because I can used my Uno proto shields and these modules supports 5V DC, as opposed to the typical MicroPython modules that only support 3.3V. The fans will work with 3.3V but they generate a lot more wind power at 5V.
The L9110 fans are designed for Arduino projects and they only cost about $5. These fans have four pins: VCC, GND, INA (direction), and INB (on/off). For this project I only used forward spinning fans, so only pin INB was used.

Boat Construction
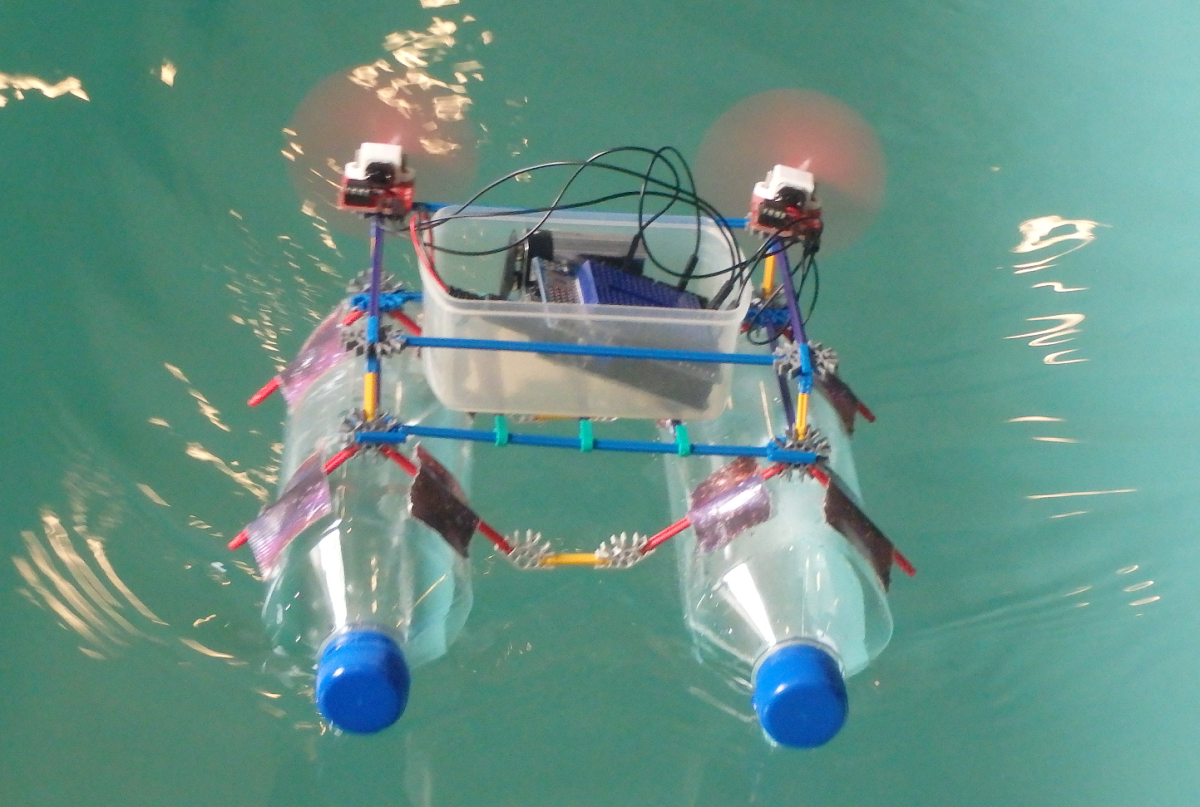
For the boat frame I used K’Nex pieces because they are light weight and sturdy, however there a lot of other materials that could be used. Water bottles were used for flotation, and duct tape was used to secure the bottles to the frame. To help protect the electronics a small plastic snack container was used. I wire wrapped the fans to the boat frame.

MicroPython Setup
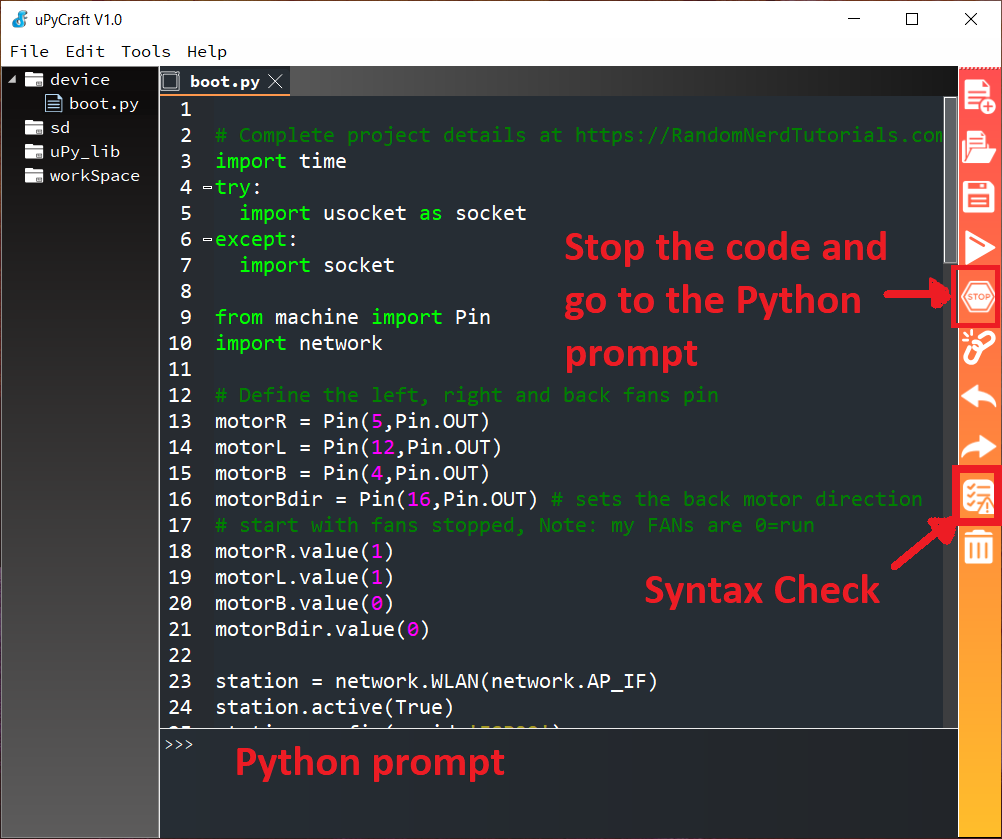
There are a few choices for MicroPython development. I found that the uPyCraft IDE offered a nice integrated environment (Figure 5), and there are some excellent tutorials to help you get started.
For MicroPython projects you typically create 2 Python applications, a boot.py and a main.py file. I like to equate this to Arduino where you have a setup() function and a loop() function. For this example I wanted to keep the documentation simple so I put everything in the boot.py file, but it’s recommended to use main.py for larger projects.
Creating an Access Point
The picture below shows how to setup an access point in just a few lines of code. For this example the access point is called ‘ESP32’ with a password of ‘12345678’. When the code is run you will be able to see when a remote user connects and disconnects to the access point.

MicroPython Web Server
After getting the Access Point working the next step is to create a Web server. This is a simple Web server project so I embedded the HTML content into my Python code, however for a more complex application I would definitely have my web pages as files that are independent from the code.
For the Web Server example application , we start with the access point connection code, then we setup a socket on port 80. The HTTP request/response sequence is passed through a function called web_page(request). In web_page(request) the code looks for keywords in the HREF request.
# MicroPython boot.py - Access Point Web Server

try:
  import usocket as socket
except:
  import socket

import network

station = network.WLAN(network.AP_IF)
station.active(True)
station.config(essid='ESP32')
station.config(authmode=3,password='12345678')

while station.isconnected() == False:
  pass

print('Connection successful')
print(station.ifconfig())

def web_page(request):

  fans_state = ""
  if request.find('/?forward') > 0:
    fans_state="Going Forward"
  if request.find('/?Stopped') > 0:
    fans_state="Stopped"

  html = """<html><head> <title>Ice Boat Web Server</title>
  <meta name="viewport" content="width=device-width, initial-scale=1">
  <link rel="icon" href="data:,"> <style>
  html{font-family: Helvetica; display:inline-block; margin: 0px auto; text-align: center;}
  h1{color: #0F3376; padding: 2vh;}p{font-size: 1.5rem;}
  .button{display: inline-block; background-color: #e7bd3b; border: none;
  border-radius: 4px; color: white; text-decoration: none; font-size: 30px; width:100%}
  </style></head>
  <body> <h1>Ice Boat Web Server</h1>
  <p>ICE Boat : <strong>""" + fans_state + """</strong></p>
  <p><a href='/?forward'><button class="button">Forward</button></a></p>
  <p><a href='/?stop'><button class="button button">STOP</button></a></p>

  </body></html>"""

  return html

s = socket.socket(socket.AF_INET, socket.SOCK_STREAM)
s.bind(('', 80))
s.listen(5)

while True:
  conn, addr = s.accept()
  print('Got a connection from %s' % str(addr))
  request = conn.recv(1024)
  request = str(request)
  print('The Content = %s' % request)
  response = web_page(request)
  conn.send(response)
  conn.close()
The embedded HTML code passes keywords using anchor tags, for example: <a href=’/?forward’>. Often we use mobile frameworks like Bootstrap to help with formatting, however because we’re running a standalone access point we need to manually define all our style codes.
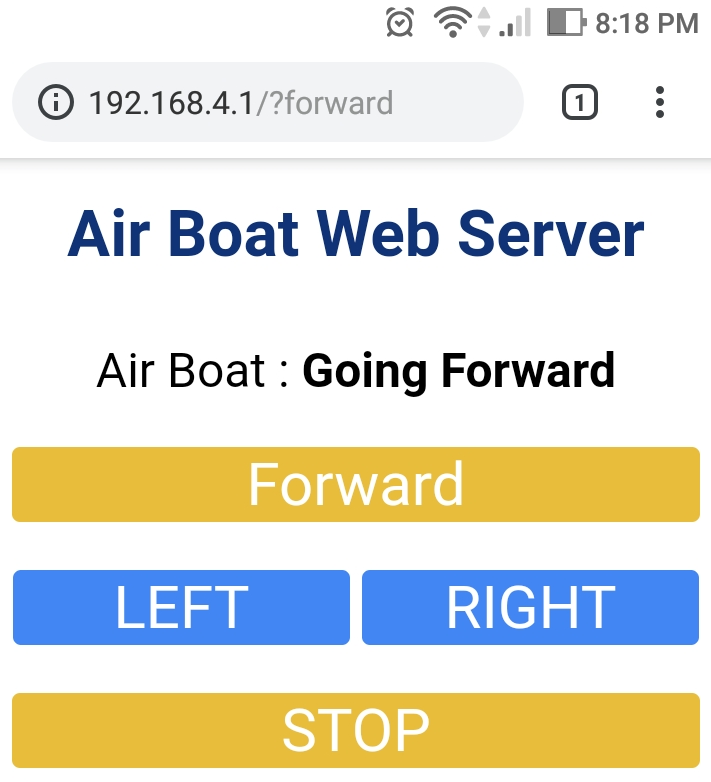
To access our MicroPython web server, use the address: 192.168.4.1. This is the default address (in the access point setup you can change this). When our web server is running we should be able to toggle the stop/forward states.
Writing Outputs
The MicroPython command line interface is good way to test outputs. To access the command line interface, use the connect button and then enter “Control-C”.
To manage pins on the hardware, machine library is used :
from machine import Pin
Then pin objects can be defined as either inputs or outputs:
Pin14 = Pin(14, Pin.IN)
Pin5 = Pin(5, Pin.OUT)
The value of a pin is read using: pinobject.value(), and set with: pinobject.value(thevalue) .

Final Application
Now that we have all the pieces working independently we can pull it all together. For the final code I’ve defined two fans (motorR and motorL), and a fan control function is called from the web requests.
# MicroPython boot.py - Access Point and Airboat Web Controls
import time
try:
  import usocket as socket
except:
  import socket

from machine import Pin
import network

# Define the left, right and back fans pin
motorR = Pin(12,Pin.OUT)
motorL = Pin(4,Pin.OUT)

# start with fans stopped, Note: my FANs are 0=run
motorR.value(1)
motorL.value(1)


station = network.WLAN(network.AP_IF)
station.active(True)
station.config(essid='ESP32')
station.config(authmode=3,password='12345678')

while station.isconnected() == False:
  pass

print('Connection successful')
print(station.ifconfig())

def fancontrol(left,right):
  motorL.value(left)
  motorR.value(right)

def web_page(request):

  fans_state = "Stopped"
  if request.find('/?forward') > 0:
    fans_state="Going Forward"
    fancontrol(0,0)
  if request.find('/?left') > 0:
    fans_state="Going Left"
    fancontrol(1,0)
  if request.find('/?right') > 0:
    fans_state="Going Right"
    fancontrol(0,1)
  if request.find('/?stop') > 0:
    fans_state="Stopped"
    fancontrol(1,1)

  html = """<html><head> <title>Air Boat Web Server</title>
  <meta name="viewport" content="width=device-width, initial-scale=1">
  <link rel="icon" href="data:,"> <style>
  html{font-family: Helvetica; display:inline-block; margin: 0px auto; text-align: center;}
  h1{color: #0F3376; padding: 2vh;}p{font-size: 1.5rem;}
  .button{display: inline-block; background-color: #e7bd3b; border: none;
  border-radius: 4px; color: white; text-decoration: none; font-size: 30px; width:100%}
  .button2{background-color: #4286f4; width:49%}
  </style></head>
  <body> <h1>Air Boat Web Server</h1>
  <p>Air Boat : <strong>""" + fans_state + """</strong></p>
  <p><a href='/?forward'><button class="button">Forward</button></a></p>
  <p><a href='/?left'><button class="button button2">LEFT</button></a>
  <a href='/?right'><button class="button button2" >RIGHT</button></a></p>
  <p><a href='/?stop'><button class="button button">STOP</button></a></p>

  </body></html>"""

  return html

s = socket.socket(socket.AF_INET, socket.SOCK_STREAM)
s.bind(('', 80))
s.listen(5)

while True:
  conn, addr = s.accept()
  print('Got a connection from %s' % str(addr))
  request = conn.recv(1024)
  request = str(request)
  print('The Content = %s' % request)
  response = web_page(request)
  conn.send(response)
  conn.close()
Summary
You’ll be quite surprised about how fast even 2 fans will move the air boat. Balancing the direction of the fans or adding a simple rudder may be required to ensure that it keeps a straight forward direction.
I’ve done the same project on the exact same hardware in Anduino C++ and I would say the response speed is similar but the Python code might be slightly leaner. I found that the MicroPython IDE wasn’t as robust as the Arduino IDE, but I really enjoyed doing interactive Python testing from a command prompt.
I won’t be giving up on Arduino C++, but I can definitely see a place for MicroPython, especially for projects with lots of string manipulation.

I could use some more detail for pin connections.
LikeLike
Hi, For the pin connections we’ve worked with 2,3 and 4 fans. However we’ve found that for an airboat 2 fans running at 5VDC works really well. For this example pins : D4 and D12 were used, and they connected to the INB (on/off) fan pins. If the fans are mounted in the same direction then you don’t need to wire INA (direction) fan pins. When you use 3 and 4 fans the wiring and logic can be ugly if you need to mount some of fans forward facing and some backward facing.
It’s important to note that depending on the module that you use the ESP8266 chip may cause the pins not to line up with standard Arduino pinouts. See the specific documentation for the board that you are using. I used the Wemos D1 (Uno) board which works great but unfortunately the pin don’t line up at all with the standard Arduino Uno pins.
LikeLike