
Go or GoLang is a compiled programming language developed by Google.
Go is widely used for Web Development and it is one of the fastest growing programming languages today. Unlike Java which is runs in a JVM (Java Virtual Machine) , Go compiles directly to Windows, OS X or Linux executable files.
In this blog we will look at creating two Go programs that talk to Raspberry Pi GPIO. The first will be a simple keyboard input program and the second will be a standalone Go web app to control GPIO pins.
Installation
To install go enter:
$ sudo apt-get install golang
To test that the install is working you can check the Go version number:
$ go version
go version go1.7.4 linux/arm
A “Hello World” example (hello.go) is:
package main

import "fmt"

func main() {

  fmt.Println("Hello World");

}
The hello.go code is compiled and ran by:
$ go build hello.go  # compile the go code

$ ./hello   # run the go code

Hello World
Raspberry Pi GPIO
There are a number of different ways to have Go connect to the Pi General Purpose Inputs and Outputs (GPIO). For this example I am going to look at shelling out to the gpio command line utility, but there are also go rpi libaries that can be used.
For testing I like to use the gpio utility because it offers a good selection of commands and I can manually test and verify the command before I use them in my Go code. For help on gpio use the -h option.
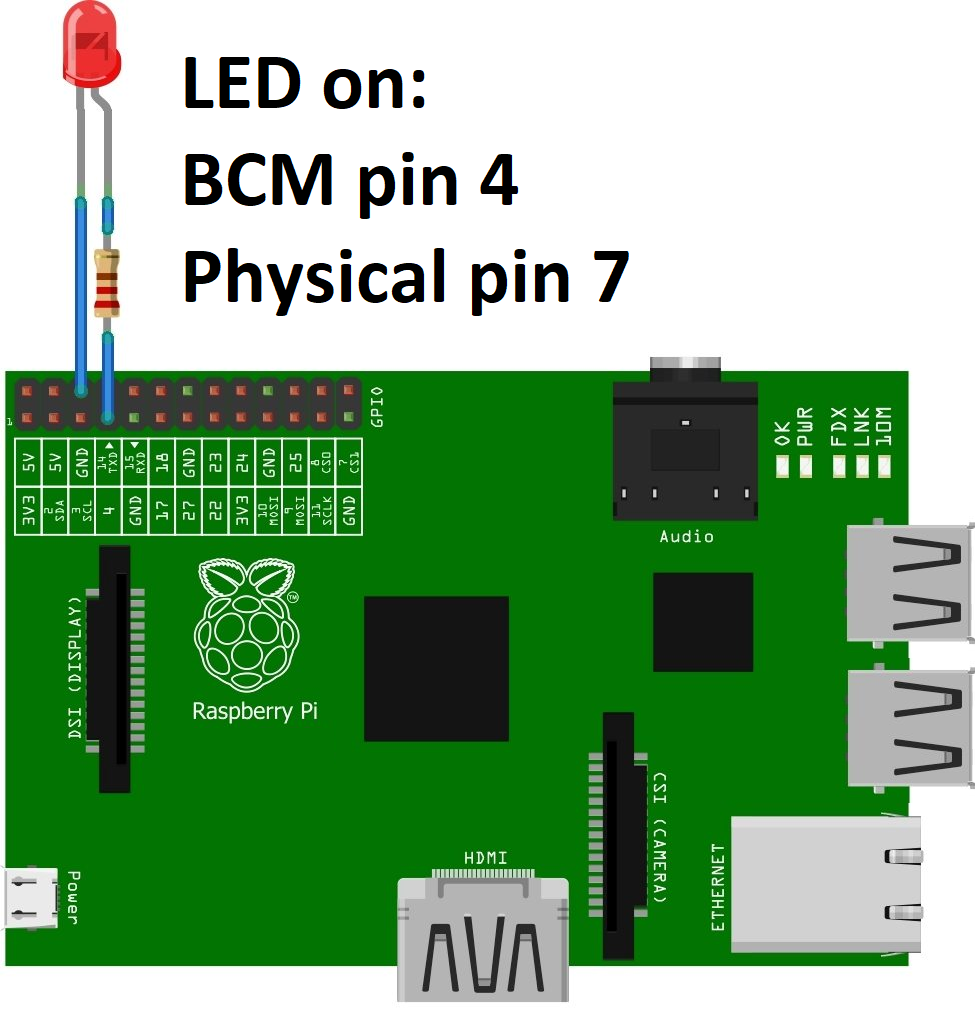
The Raspberry Pi hardware setup used an LED with a resistor on physical pin 7 (BCM pin 4).
Our first go program (keyin.go) will read keyboard input and then to shell out twice to gpio, first time to write a value and the second time to read the value back.
package main

import (
    "bufio"
    "fmt"
    "os/exec"
    "os"
)

func main() {
    // Get keyboard input
    reader := bufio.NewReader(os.Stdin)
    fmt.Print("Enter value for GPIO pin 7 : ")
    pinval, _ := reader.ReadString('\n')

    // Write to GPIO pin 7 using keyboard input
    testCmd := exec.Command("gpio","write", "7", pinval)
    testOut, err := testCmd.Output()
    if err != nil {
        println(err)
    }
    // Read back the GPIO pin 7 status
    testCmd = exec.Command("gpio","read", "7")
    testOut, err = testCmd.Output()
    if err != nil {
        println(err)
    } else {
      fmt.Print("GPIO Pin 4 value : ")
      fmt.Println(string(testOut))
    }
}
To compile and run the keyin.go program:
 $ go build keyin.go
 $ ./keyin
Enter value for GPIO pin 7 : 1
GPIO Pin 4 value : 1
Simple Go Web Application
For a starting example we’ll make a go web application (web_static.go) show a web page called web_static.html.
The web_static.html file will be :
<html>
  <head>
    <title>GO PI Static Page</title>
  </head>
  <body>
    <h1>GO PI Static Page</h1>
    <hr>
    This is a static test page
  </body>
</html>
The web_static.go program will need to import the “net/http” library. A http.HandleFunc call is used to look for the default address “/” and serve up our web_static.html file. The http.ListenAndServe function listens for web requests on port 8081.
package main

import (
    "log"
    "net/http"
)

func main() {
    // Create default web handler, and call a starting web page
    http.HandleFunc("/", func(w http.ResponseWriter, r *http.Request) {
        http.ServeFile(w, r, "web_static.html")
        println("Default Web Page")
    })
    // start a listening on port 8081
    log.Fatal(http.ListenAndServe("8081", nil))

}
The Go code can be compiled and run by:
$ go build web_static.go
$ ./web_static
Default Web Page
From a web browse pointed at the Raspberry Pi on port 8081, our web page will show as:

Go Web App with Pi GPIO
The next step is to create a Web Page that can pass some parameters. For this application we’ll turn a GPIO output on and off.
A new web page (go_buttons.html) is created with two buttons. HTML anchor tags are used to pass /on and /off parameters to our Web app.
A CACHE-CONTROL meta tag set to NO-CACHE is needed to ensure that the web page always refreshes. I also included an EXPIRES meta tag (= 0) so that the browser always see the page as expired . If you don’t include meta tags the web page may only update once.
<html>
  <head>
    <title>GO PI GPIO</title>
    <META HTTP-EQUIV="CACHE-CONTROL" CONTENT="NO-CACHE">
    <META HTTP-EQUIV="EXPIRES" CONTENT="0">
  </head>
  <body>
    <h1>Go Raspberry Pi GPIO Test</h1>
    <a href="/on"><button>Set LED ON</button></a><br>
    <a href="/off"><button>Set LED OFF</button></a>
  </body>
</html>
Our new Go Web app (go_buttons.go) now includes two more http.HandleFunc handler functions, one for /on and for /off. These handler functions call a new function called gpio that is used to write a outputs and read back the output status.
Our newly created gpio function shells out twice to the gpio command line utility, first time to write a value and the second time to read the value back.
package main

import (
	"log"
	"net/http"
	"os/exec"
)
func gpio( pinval string) {
    testCmd := exec.Command("gpio","write", "7", pinval)
    testOut, err := testCmd.Output()
    if err != nil {
        println(err)
    }
    testCmd = exec.Command("gpio","read", "7")
    testOut, err = testCmd.Output()
    if err != nil {
        println(err)
    } else {
      print("GPIO Pin 4 value : ")
      println(string(testOut))
    }
}

func main() {

	http.HandleFunc("/", func(w http.ResponseWriter, r *http.Request) {
		http.ServeFile(w, r, "go_buttons.html")
		println("Default Web Page")
	})

	http.HandleFunc("/on", func(w http.ResponseWriter, r *http.Request) {
                 http.ServeFile(w, r, "go_buttons.html")
		 println("Web Page sent : ON")
		 gpio("1")

	})

	http.HandleFunc("/off", func(w http.ResponseWriter, r *http.Request) {
                 http.ServeFile(w, r, "go_buttons.html")
		 println("Web Page sent : OFF")
		 gpio("0")
	})

	log.Fatal(http.ListenAndServe(":8081", nil))

}
To compile and run of web app go_buttons:
$ go build go_buttons.go
$ ./go_buttons

Default Web Page
Web Page sent : ON
GPIO Pin 4 value : 1

Default Web Page
Web Page sent : OFF
GPIO Pin 4 value : 0
The web page should look something like:

Summary
For a polished application I would rather use a native Go library for GPIO calls, but for prototyping I found that the gpio command line utility to be easier for trouble-shooting.
After getting a basic web page working for anchor tags for /on and /off, the next step will be to use some Javascript with AJAX to show dynamic values.
