
Typically our interfaces for projects use colorful web pages or custom GUIs. However there are many cases where a simple text interface is all that is required. This is especially true for SSH or remote connections from a Window’s client into a Raspberry Pi or Linux server.
In this blog I’d like to review a 1980’s technology called curses, with three examples. The first example will be simulated Rasp Pi scanning app in “C” and Python. The second and third examples will be in Python and they will show large text presentation and dynamic bars.
Python Curses
Python curses are standard in Python, and they include features such as:
- support ASCII draw characters
- basic color support
- window and pad objects which can be written to and cleared independently
As a first example I wanted to have a colored background, a header and footer and some dynamic text.

The first step is to define a curses main screen object (stdscr). The next step is to enable color and to create some color pairs. Using color pairs and the screen size (height, width = stdscr.getmaxyx()) it is possible to add a header and footer strip using the srtdscr.addstr command.
The stdscr.nodelay command allow the program to cycle until the stdscr.getch() call returns a key.
# curses_text.py - create a curses app with 10 dynamic values
#
import curses , time, random

# create a curses object
stdscr = curses.initscr()
height, width = stdscr.getmaxyx() # get the window size

# define two color pairs, 1- header/footer , 2 - dynamic text, 3 - background
curses.start_color()
curses.init_pair(1, curses.COLOR_RED, curses.COLOR_WHITE)
curses.init_pair(2, curses.COLOR_GREEN, curses.COLOR_BLACK)
curses.init_pair(3, curses.COLOR_WHITE, curses.COLOR_BLUE)

# Write a header and footer, first write colored strip, then write text
stdscr.bkgd(curses.color_pair(3))
stdscr.addstr(0, 0, " " * width,curses.color_pair(1) )
stdscr.addstr(height-1, 0, " " * (width - 1),curses.color_pair(1) )
stdscr.addstr(0, 0, " Curses Dynamic Text Example" ,curses.color_pair(1) )
stdscr.addstr(height-1, 0, " Key Commands : q - to quit " ,curses.color_pair(1) )
stdscr.addstr(3, 5, "RASPBERRY PI SIMULATED SENSOR VALUES" ,curses.A_BOLD )
stdscr.refresh()

# Cycle to update text. Enter a 'q' to quit
k = 0
stdscr.nodelay(1)
while (k != ord('q')):
# write 10 lines text with a label and then some random numbers
for i in range(1,11):
    stdscr.addstr(4+ i, 5, "Sensor " + str(i) + " : " ,curses.A_BOLD )
    stdscr.addstr(4+ i, 20, str(random.randint(10,99)) ,curses.color_pair(2) )
    time.sleep(2)
    k = stdscr.getch()

curses.endwin()
The simulated Pi values will refresh every 10 seconds until the “q” key is pushed and then the terminal setting are returned to normal (curses.endwin()) and the program exits.
“C” Curses Example
For this “C” example I used a Raspberry Pi. The curses library needs to be installed by:
sudo apt-get install libncurses5-dev
The curses syntax is similar between “C” and Python but not 100%. For example in Python the addstr command includes a color pair reference, but in “C” this is not supported so an attribute on/off (attron/attroff) command is used to reference the color pair. Below is the “C” code:
/* c1.c - Basic Curses Example */

#include <curses.h>
#include <stdlib.h>
#include <unistd.h>

int main(void)
{
    int row, col, k;
// Create a curses object and define color pairs
    initscr();
    getmaxyx(stdscr,row,col);
    start_color();
    init_pair(1,COLOR_RED,COLOR_WHITE);
    init_pair(2,COLOR_GREEN,COLOR_BLACK);
    init_pair(3,COLOR_WHITE,COLOR_BLUE);
    curs_set(0);
    noecho();
    //keypad(stdscr,TRUE);
    nodelay(stdscr, TRUE);
// Write a header and footer, first write colored strip, then write text
    bkgd(COLOR_PAIR(3));
    attron(COLOR_PAIR(1));
// Create a top and bottom color strip
    for (int i = 0; i < col; i++) {
        mvaddstr(0, i,  " ");
        mvaddstr(row-1, i,  " ");
    }
    mvaddstr(0, 0,  " Curses C Dynamic Text Example");
    mvaddstr(row-1, 0,  " Key Commands: q - to quit");
    attroff(COLOR_PAIR(1));
    mvaddstr(2, 5,"RASPBERRY PI SIMULATED SENSOR VALUES" );
    refresh();
// Cycle with new values every 2 seconds until a q key (133) is entered
    while (k != 113)
    {
        attroff(COLOR_PAIR(2));
        for (int i = 0; i < 10; i++) {
            mvprintw((4+i), 5,  " Sensor %d : ",i);
        }
        attron(COLOR_PAIR(2));
        for (int i = 0; i < 10; i++) {
            mvprintw((4+i), 20,  "%d",rand() %100);
        }
        k = getch();
        sleep(2);
    }
    endwin();
    exit(0);
}
To compile and run the program (c1.c) enter:
gcc -o c1 c1.c -lncurses
./c1
The “C” example should look very similar to the earlier Python example.
Figlet for Large Custom Text
Large Custom Text can be generated using the Python Figlet library. Figlet has an extensive selection of text presentations and it uses standard ASCII character to generate the large text presentations. The Figlet library is installed by:
pip install pyfiglet
An example from the Python shell:

For a Figlet example, I wanted to create a large heading and a large dynamic value.
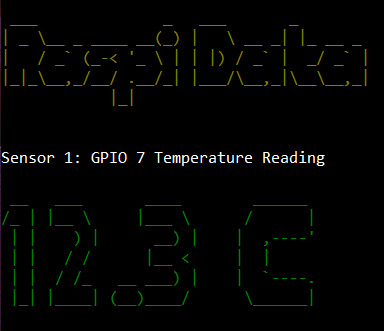
The Figlet library can be used to generate a string with user defined texted presented a large text-like format. A little bit of testing is required because the Figlet generated text can be 3,4,5 or more characters tall and the string needs to be added to very left end of the window.
# curses_di.py - show a large heading and large dynamic value
#
import curses, time
import pyfiglet, random

def get_io():
    global value1
    testvalue = str(random.randint(100,1000)/10) + " C"
    value1 = pyfiglet.figlet_format(testvalue, font = "starwars" )

# Create a string of text based on the Figlet font object
title = pyfiglet.figlet_format("Raspi Data", font = "small" )

stdscr = curses.initscr() # create a curses object
# Create a couple of color definitions
curses.start_color()
curses.init_pair(1, curses.COLOR_YELLOW, curses.COLOR_BLACK)
curses.init_pair(2, curses.COLOR_GREEN, curses.COLOR_BLACK)

# Write the BIG TITLE text string
stdscr.addstr(1,0, title,curses.color_pair(1) )
stdscr.addstr(8,0, "Sensor 1: GPIO 7 Temperature Reading" ,curses.A_BOLD)

# Cycle getting new data, enter a 'q' to quit
stdscr.nodelay(1)
k = 0
while (k != ord('q')):
    get_io() # get the data values
    stdscr.addstr(10,0, value1,curses.color_pair(2) )
    stdscr.refresh()
    time.sleep(2)

    k = stdscr.getch()

curses.endwin()
I found that the the small and doom fonts worked well in my testing. To check out and test Figlet fonts online see:
http://patorjk.com/software/taag/#p=display&f=Slant&t=Dude%20what%20are%20you%20doing%20%3F
Curses Windows
By defining a curses window it is possible to clear and write to a window that it is independent from the background. The syntax to create a curses window object is:
mynewwindow = curses.newwin(height, width, begin_y, begin_x)
Windows are ideal for applications where multiple items such as Figlet objects are used. Below is an example with two large Figlet values.

# Create a static 2 large values example
#
import curses, time
import pyfiglet, random
# Create a string of text based on the Figlet font object
title = pyfiglet.figlet_format("Weather Station 2", font = "small" )

stdscr = curses.initscr() # create a curses object
# Create a couple of color definitions
curses.start_color()
curses.init_pair(1, curses.COLOR_YELLOW, curses.COLOR_BLACK)
curses.init_pair(2, curses.COLOR_GREEN, curses.COLOR_BLACK)

# Write the BIG TITLE text string
stdscr.addstr(1,0, title,curses.color_pair(1) )
stdscr.refresh()

win1 = curses.newwin(9, 44, 6, 4)
win1.addstr(8,0, "Sensor 1: Temperature Reading" ,curses.A_BOLD)

win2 = curses.newwin(9, 44, 6, 50)
win2.addstr(8,0, "Sensor 2: Humidity Reading" ,curses.A_BOLD)
value1 = pyfiglet.figlet_format("23 C", font = "doom" )
win1.addstr(0,0,value1,curses.color_pair(2) )
win1.refresh()
value2 = pyfiglet.figlet_format("35 %", font = "doom" )
win2.addstr(0,0, value2 ,curses.color_pair(2) )
win2.refresh()

# Hit any key to exit
stdscr.getch()
curses.endwin()
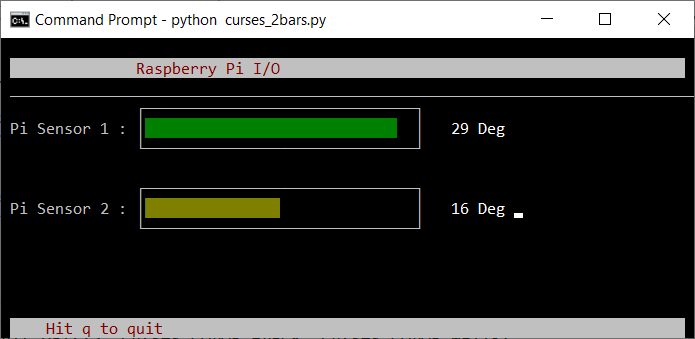
Dynamic Bars Example
For the Dynamic bars example I created a get_io function to simulate two real time data values.
As a first step I created some background information such as headings, a header and a footer. By using the call: height, width = stdscr.getmaxyx() , I am able to position banners at the top and bottom of the terminal window. All of the background info is written to the stdscr object.
Two windows objects (win1 and win2) are used for the real time dynamic bars. Old bar data is removed using the win1.clear() and win2.clear() calls. Like the static example the dynamic bars are created by writing a fill character multiplied by the actual real time value (win1.addstr(1, 1, bar * value1) ). A window.refresh() command is used to show the changes.
The stdscr.getch() method is used to catch keyboard input, and the terminal program is exited when a quit character, “q” is entered.
The complete two dynamic bar program is shown below:
# Simple bar value interface
#
import curses
import time

# get_io is using random values, but a real I/O handler would be here
def get_io():
    import random
    global value1, value2
    value1 = random.randint(1,30)
    value2 = random.randint(1,30)

bar = '█' # an extended ASCII 'fill' character
stdscr = curses.initscr()
height, width = stdscr.getmaxyx() # get the window size
curses.start_color()
curses.init_pair(1, curses.COLOR_RED, curses.COLOR_WHITE)
curses.init_pair(2, curses.COLOR_GREEN, curses.COLOR_BLACK)
curses.init_pair(3, curses.COLOR_YELLOW, curses.COLOR_BLACK)

# layout the header and footer
stdscr.addstr(1,1, " " * (width -2),curses.color_pair(1) )
stdscr.addstr(1,15, "Raspberry Pi I/O",curses.color_pair(1) )
stdscr.hline(2,1,"_",width)
stdscr.addstr(height -1,1, " " * (width -2),curses.color_pair(1) )
stdscr.addstr(height -1,5, "Hit q to quit",curses.color_pair(1) )

# add some labels
stdscr.addstr(4,1, "Pi Sensor 1 :")
stdscr.addstr(8,1, "Pi Sensor 2 :")

# Define windows to be used for bar charts
win1 = curses.newwin(3, 32, 3, 15) # curses.newwin(height, width, begin_y, begin_x)
win2 = curses.newwin(3, 32, 7, 15) # curses.newwin(height, width, begin_y, begin_x)

# Use the 'q' key to quit
k = 0
while (k != ord('q')):
    get_io() # get the data values
    win1.clear()
    win1.border(0)
    win2.clear()
    win2.border(0)
# create bars bases on the returned values
    win1.addstr(1, 1, bar * value1, curses.color_pair(2))
    win1.refresh()
    win2.addstr(1, 1, bar * value2 , curses.color_pair(3))
    win2.refresh()
# add numeric values beside the bars
    stdscr.addstr(4,50, str(value1) + " Deg ",curses.A_BOLD )
    stdscr.addstr(8,50, str(value2) + " Deg ",curses.A_BOLD )
    stdscr.refresh()
    time.sleep(2)
    stdscr.nodelay(1)
    k = stdscr.getch() # look for a keyboard input, but don't wait

curses.endwin() # restore the terminal settings back to the original
For testing I used a random simulator for the data but the get_io function could be easily configured to connect to a Raspberry Pi or Arduino module.
The outline boxes in the window object could look strange if you are using a Window’s based SSH client like Putty. To create the problem in Putty’s settings, select: Window -> Translations and use VSCII as the remote character set.

Final Comments
Curses is definitely an ‘old school’ technology but it offers a simple solution for SSH and terminal based connections.

IMO, graphics created by ncurses are more pleasing to look at than graphics created by actual graphics libraries. I guess I’m just old-fashioned.
LikeLike
I totally agree, simple is best. We spend way too much time messing around with web interfaces and ‘flavour of week’ graphic libraries.
LikeLike